Understanding the Large Map
This topic explains how to interpret the symbols and functions on the large map within Trash Flow. It also provides links to detailed explanations on how to use each function.
Note: You can open the large map from a customer account, route, or many other places in Trash Flow. We use the term “large map” to distinguish it from the maps visible from the Map tab on a customer account or container placement.
Reminder: Address Verification and Geocoding
The Address Verification System (AVS) checks addresses of customers, containers, route stops, landfills, etc. against national mapping databases and assigns them the correct latitude/longitude. You can see the pinned location on the Map tab of a customer account or container placement. Your business address, container yards, and landfills appear under .
Example Map
The large map provides a way to see different markers on one map, e.g. all customers in the TEMPORARY ROLL-OFF bill group plus all work orders assigned to Bob today. Using the map makes it easy to spot customers who are mapped in the wrong location as well. The legend at top-left of the large map lists everything you've placed on the map along with corresponding colored markers. The boundary button  at top right lets you draw shapes on the map and do something with the markers inside: run a customer list, create a route, get a report of container placements, etc. The buttons at bottom right are standard map tools to move, zoom, tilt, and rotate the map.
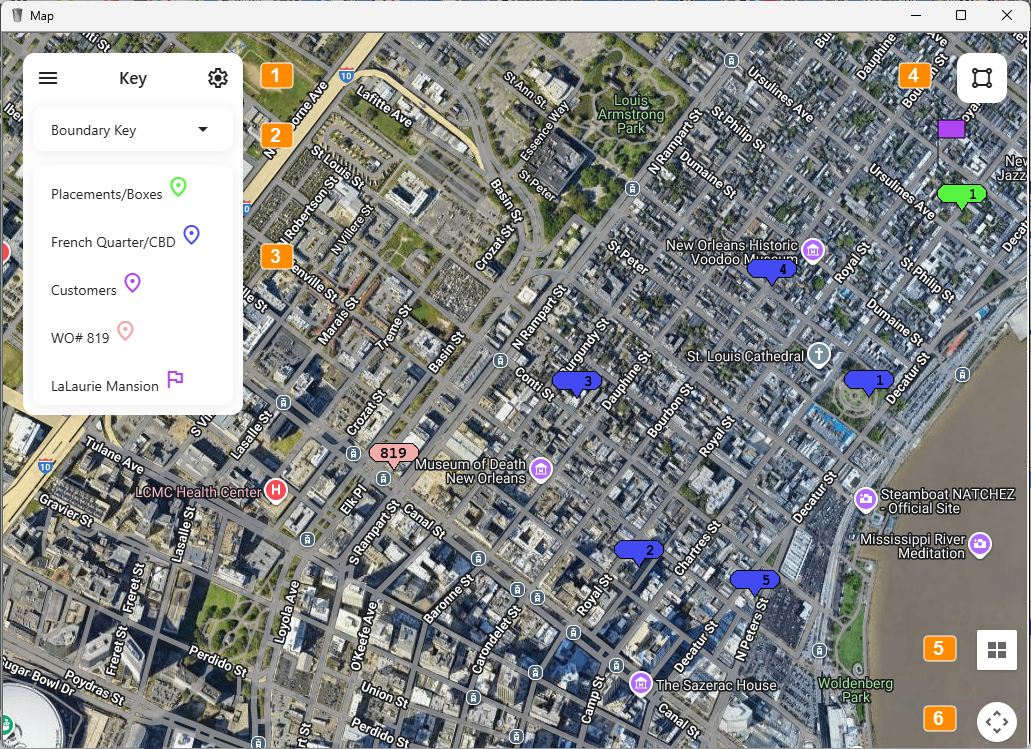
A map showing customers, a route, a container placement, and a work order.
Map Legend and Controls
The map legend and available buttons change depending on what you've already done on the map. Screenshots of the other possibilities appear at the end of this page.
- Menu: This label appears when you first open the map. Other possible labels include:
- : This appears if you click the three-line "hamburger" button on the left to view the list of items currently being displayed. It can also collapse the displayed menu.
- Settings: This appears if you click the gear button on the right. This allows you to switch the Map Type between road map and satellite or change the Marker Size on the map.
- : This label appears after you click the Boundary Key dropdown to view a list of all your saved boundaries.
- : This button expands or collapses the list of all your saved boundaries. Boundaries being displayed on the map have a colored shape beside the name, e.g.
 .
. - : This lists all the markers currently loaded on the map. Types of markers include customers, route stops, work orders, or container placements.
- : This button lets you draw shapes on the map, then do something with all the markers inside it. Options include running a customer list, creating a container placement report or creating a new route.
- : This opens a tool that lets you tilt or rotate the map view.
- Camera Controls: This opens a tool that lets you move the map and zoom in or out.
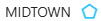
In the example below we have two boundaries, "across canal" and "Algiers Point". The Algiers Point boundary is saved, but not displayed.
Boundary Tool
A map showing a boundary, some route stop markers inside it, and the commands available.
The following tools are available in the boundary menu on the right.
-
: This button allows you to click and hold your mouse on points of the boundary to move, reshape, and resize it.
-
: This button lets you rename the boundary. Trash Flow doesn't allow you to use the same name as an existing boundary.
-
Delete: This button deletes the boundary permanently.
-
Customer Report: Opens a form where you can create a customer list from the markers inside the boundary. You can also send an email to customers in this area by choosing Bulk Email for the Report Format.
-
Container Placement Report: This button opens a form where you can create a container placement report from markers inside the boundary.
-
Create Route: This button lets you create a new route from the markers inside the boundary.
See Also
View a Group of Customers On the Map
Version note: Map boundaries were introduced in Trash Flow version 3.02.094, Nov 2025.