Create a Web Payment Report
The web payment report lists payments and activity from the TrashBilling.com website along with payments and customer account changes entered by a Trash Flow user. This page tells you how to create a Web Payment Report. The report provides a chronological list of electronic payment and account activity and provides quite a few filters to let users generate a report of only the information they're looking for.
Common Uses
Some reasons to run the Web Payment Report:
- get a list of recent declined payments to contact those customers;
- see if anyone has signed up for (or canceled) automatic payments;
- confirm that any chargebacks or refunds have gone through;
- look for how many customers are paying online to get a sense of the time you're saving.
Before You Begin
You must have signed up to use our Trash Billing service to process electronic payments and email bills, and the approval must be completed. At least some electronic payments must have been completed and/or account changes made online in order to provide report data.
Context
Customers who visit the TrashBilling.com website can make payments, sign up for autopay, and sign up for email billing. (They can also cancel autopay and change or remove their email address.) When you pick up web payments Trash Flow checks the website and records those transactions into customer accounts. The web payment report gives a chronological list of activities on the website within the given date range.
Create the Report
- From the Trash Flow tilebar, open the Trash Billing window by clicking . The Trash Billing (Electromic Billing) window opens.
- In the menu across the top click .
- Use the Start Date and End Date to pick the period you want the report to cover.
- If you operate more than one Business using Trash Flow choose whether you want to run the report for only a specific business.
- If you only want to see certain Transaction Types use the dropdown to choose multiple and check the box(es) you need; further explanation of each transaction type is provided below.
- If desired choose whether to
- only see returns and declines;
- only see results for ended or suspended customers;
- see only results for bill-to master and sub accounts; or
- export the report to a CSV file instead of viewing a PDF.
- Click to create the report.
- Web Payments: Payment made by the customer logging in on the Trash Billing website. These will have a 5-digit sequence ID that can assist our Trash Billing department in searching for transactions.
- Auto Pay: Part of an autopay batch submitted by a Trash Flow user. These will always have a 14-digit ID in the Batch column.
- AP Sign Ups: Customers who signed up online for automatic payments.
- Corrections: Changes to existing autopay information, cancellation of autopay, clearing bad data like invalid bank account numbers and expired credit cards, and changing the email address on file.
- Scanned Checks: Paper checks run through a check scanning machine and submitted for electronic payment.
- Direct Payments: Payment entered by a Trash Flow user from the customer's account window. These will not have a 5-digit sequence ID in the SEQshow.php?sw=tf&resolve_id=-1 column.
- Email Bill Changes:&show.php?sw=tf&resolve_id=-1160;Customer signed up for or canceled email billing.
- RPPS: Customer made the payment through their bank's bill paying service.
Sample Report
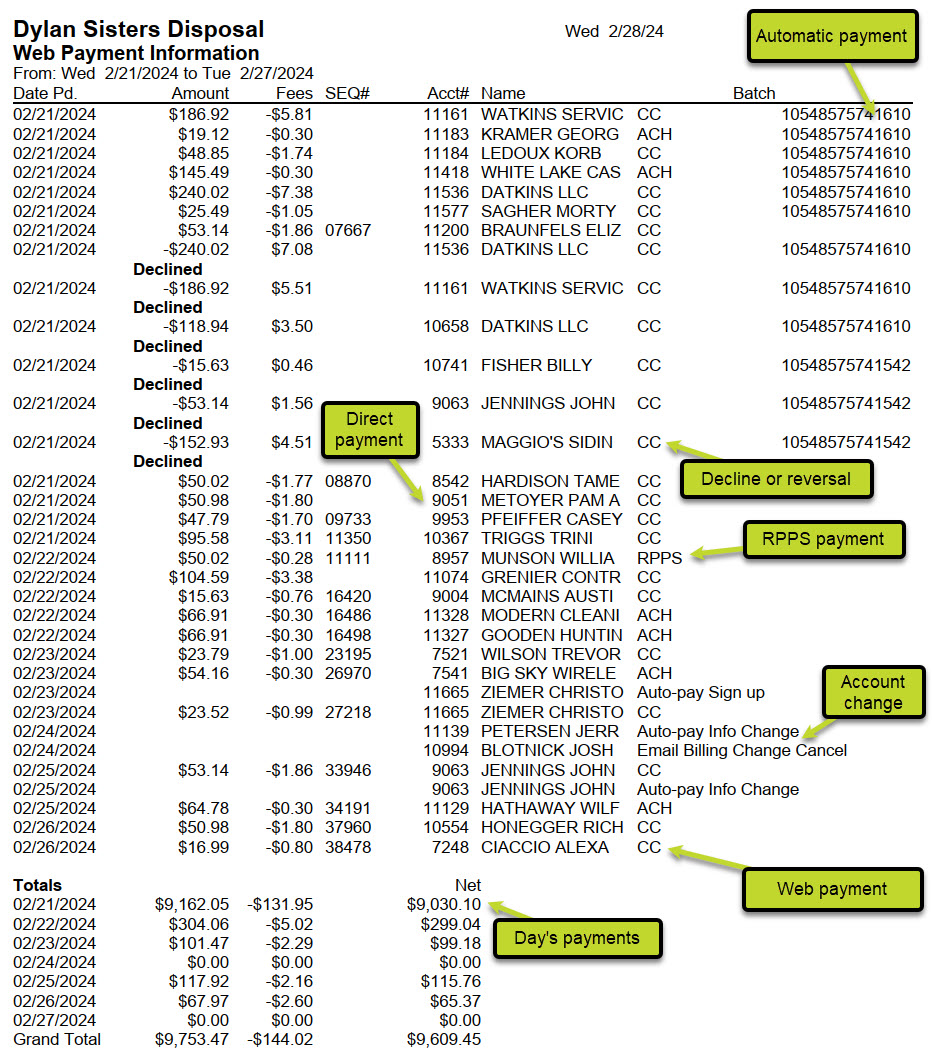
Below is an explanation of some items on the sample payment report.
- Decline or reversal: Declined transactions and refunded payments will list the reason (if available) as it appears in customer financial history;
- Fees: Trashbilling charges fees per transaction, so each transaction shows the fees being deducted before we deposit the money into your account. Note that fees for a declined or reversed transaction will be positive since we are depositing that fee back into your bank account.
- Account changes: Customer signed up for (or canceled) automatic payments; customer signs up for emailed bills or change their address;
- Correction: (not pictured) A payment was moved from one customer account to another.
- Day's payments: The report always ends with a summary for each day in the date range:&show.php?sw=tf&resolve_id=-1160;total amount of payments, the amount we withdraw for fees, and the net in electronic payments for that day.
For Trash Flow Mobile users: Report options on Trash Flow Mobile will work just as described in this article and appear in the same order. The user interface is slightly different to accommodate how we use tablets and phones; for more details, or to learn more about accessing your data from a phone or tablet, see Using Trash Flow Mobile.
See Also