View Notifications
This article explains how to view the list of notifications in Trash Flow and configure that window to display only the notifications you want to see.
Context
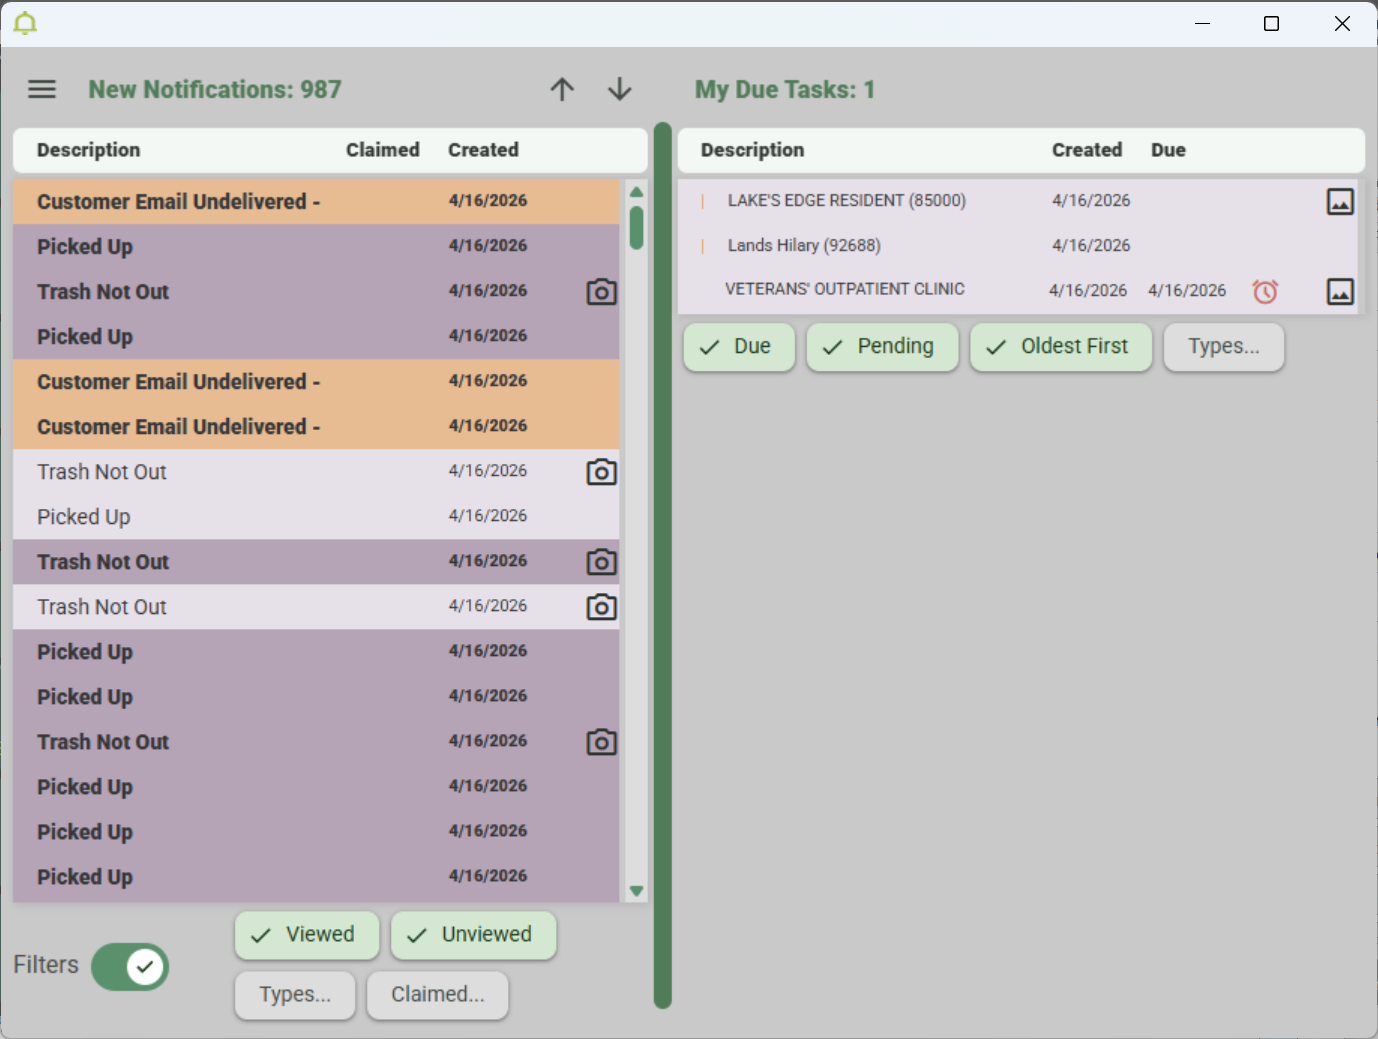
Trash Flow provides a centralized window where you can see notifications coming in from TeleRoute, Trash Billing, and more. Each Trash Flow user sees notification types enabled for them or their department. The window usually shows two workspaces side by side, as shown below. You can also click and drag to narrow the window and stack them vertically.
Color Key for Notification Types
System - Problems connecting to the database, slow speed warnings, etc.
General - Messages sent by us at Trash Flow about holidays, server maintenance, payment processing, etc..
TeleRoute Exception - Notifications coming in from drivers like Trash Not Out, Route Image, etc. These can be configured through .
Trash Billing - Payments by ended or suspended customers and payments to invalid customer accounts
Messages - Messages from customers and bounced email messages from our mail server.
Further details can be found at Reference: Notification Types.
View the Notifications
- Click on the Trash Flow tilebar.
- The Notifications window appears. Uncompleted notifications for you or your department appear in the first workspace. New notifications have a darker background and bold text. Notifications you have viewed become unbolded.
- The other workspace shows notifications you have claimed, but not yet completed. These remain until they've been dealt with.
- Click a notification to select it.
- The window changes to show the selected notification in the other workspace. It will have the date and time it was created, a description, and buttons to or the notification. There may also be relevant customer accounts, buttons to create a new account or move a route stop, payment amounts, a route stop number, etc.; these differ by notification type.
- Click to assign the notification to yourself. The assumption is that when someone claims a notification they will take any needed action and mark the notification as completed.
Optional: If someone else needs to deal with a notification you've claimed, select it and click . Doing this takes you off the notification and makes it available for others. - For some notification types another button appears that lets you take action. Use these as needed. Example: An ended or suspended customer makes a payment and Trash Flow creates a notification. An button appears when you select the notification. Many actions are self-explanatory, but see Reference: Notification Types for a complete list.
- When you are finished with a notification click or . If desired you can enter further details in the Processed Note field. See Complete Notifications for further information.
View Your Tasks
Once you claim a notification it becomes a task. These appear in the second workspace of the Notifications window. If you don't see them listed click My Due Tasks. Select a task to show the details in the other workspace. Click New Notifications to return to the list of notifications.
Parts of the Notification Window

-
This menu button lets you switch between viewing active and archived notifications; complete notifications in bulk; and choose window Settings to:
- open the notifications window on startup;
- switch between using icons or colored bars to indicate extra information; and
- choose whether to show colors indicating notification types.
- This is the number of new, unread notifications. Even if you have filtered the view to limit which ones show this number is still counting all notifications.
- Use the ↑ ↓ arrows to page through the list.
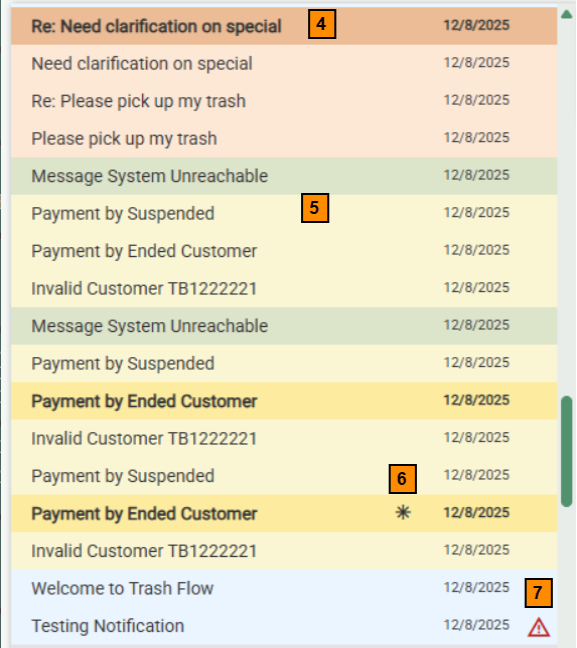
- Unread notifications show in boldface with a darker background.
- Unclaimed notifications have a lighter background.
- An asterisk indicates that another user has claimed this notification.
- The red warning icon marks a critical notification sent by us at Trash Flow: an interruption in credit card processing, email delays, etc.

- These buttons let you choose whether to see viewed and/or unviewed notifications.
- Click this button to choose which type of notifications to display: General, System, TeleRoute Exceptions, Trash Billing, and Messages. You can also choose to see only exceptions from a certain route and only customer messages or bounced email notifications.
- This button lets you hide notifications claimed by other users.
Note: When viewing archived notifications an option appears to View Notification ID. Trash Flow uses these numbers for internal logging, and you should not need them unless you're troubleshooting problems with one of our technicians.
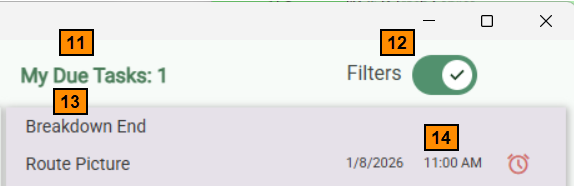
- The second workspace (usually on the right) shows all tasks, or notifications you have claimed. My Due Tasks shows the number of tasks where a due date has been added that's due today or past due.
- This slider chooses whether to show the available filters below the lists of unclaimed and claimed notifications. The position of the slider itself changes depending on the size of the window.
- The right side of this window lists all your claimed notifications. A notification can only be claimed by one person at a time.
- Any task where a due date has been added shows the date and time due next to it.

- These buttons let you choose whether to see due and/or pending notifications. Pending notifications have a due date later than today's date.
- This button chooses whether to sort the notifications Oldest First or Newest First.
- Click this button to choose which type of claimed notifications to display: General, System, TeleRoute Exceptions, Trash Billing, and Messages.
See Also