This page explains how to import a list of customers from other software directly into Trash Flow
Before You Begin
You must have the Commercial Billing module of Trash Flow. You will also need a comma-separated value (CSV) file containing the customers you wish to import. Each row needs to represent information about a single customer account. The columns of different data about the customers can be in any order.
Context
Trash Flow provides a service where we will import customer accounts from other software (QuickBooks, Terra Trash, Delta, etc.) for you. You can speak with our Data team and arrange for us to import customer names, addresses, balances, and possibly more directly into Trash Flow. The program also offers a way for you to import customers yourself. It takes some technical savvy, but offers a practical solution for companies who regularly sign up large blocks of new customers.
Why Import Customers?
- Speed. Manually creating one customer account doesn’t take long. Entering 20 is more of a time commitment. When you have a few hundred it might be worth it to get a file with consistent information and just let the computer do the work.
- Economy. If you are willing to spend a little time learning how to import customers yourself it can save your business hundreds of dollars compared to the time it takes to enter customers one at a time.
- Consistency. Importing customers requires a comma-separated value (CSV) file. The work of going through that file to make sure everything is set up correctly before the import is valuable: you can learn who had missing rates, whose balance seems off, who was not properly assigned to a route, etc.
Understanding the Customer Import Window
A more detailed guide to the steps to follow is listed below, but you may find it useful to familiarize yourself with the window. Click .
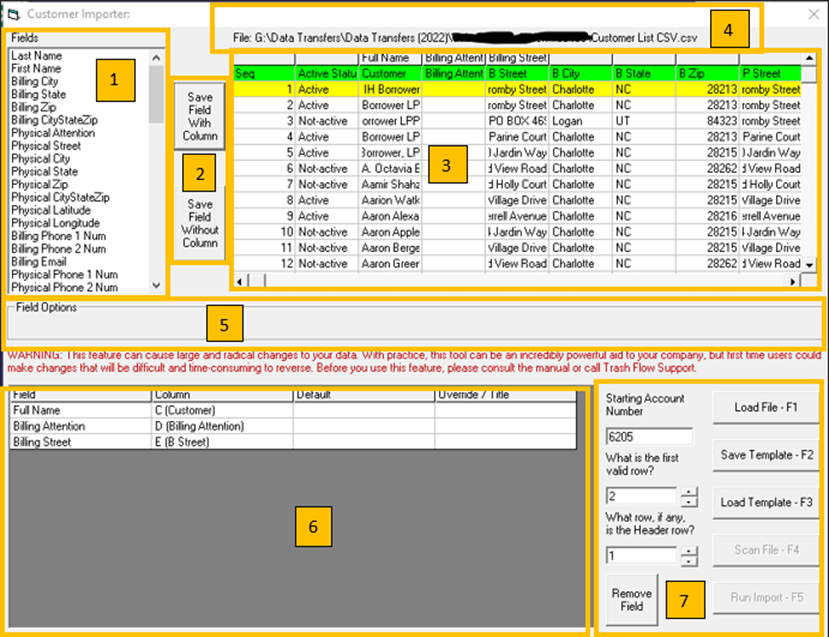
- Fields pane: These are the fields that are available in the import tool. Not everything in Trash Flow can be imported. For a complete list, see the reference below. The Sort by drop-down menu allows you to sort the Field pane alphabetically or to use the original default sort.
- Save Field pane: Save Field With Column is what you click on after choosing a field (1) and a column from your CSV sample (3). This locks in the column of your CSV to the field you selected. The field will no longer be listed in Fields pane (1). Instead, it will be shown the in Field Selection pane (6). Use Save Field With Column if there’s a column in your CSV with the relevant data. Use Save Field Without Column if there isn’t a column in your CSV and you are using the Field Options pane (6) to select a field for all the customers in the import.
- CSV sample pane: Shows the first 20 lines of the CSV you’re importing. You can scroll left/right and up/down in this pane. NOTE: You do not have to assign fields to every column in your import CSV. Any columns you don’t assign a field to will be ignored and not imported.
- Path to CSV pane: This shows the location and name of the CSV you are using for the import.
- Field Options pane: Options for Override and Default will sometimes be available here. Default tells Trash Flow "if the route, bill code, etc. is not listed then use this one." Override tells Trash Flow "always use this value, even if some rows in the CSV have different data."
- Field Selection pane: Shows which column in your CSV has been matched with a field. It also shows if a default, override, or title has been entered for that field from Field Options.
- Function pane: These are buttons and tools that you will use during the import.
Import the customers
- Export or otherwise create a CSV file that you want to import into Trash Flow. TIP: The software that you import customers from probably has an export tool that will help you create this file. If you are not sure how to do this please call Trash Flow; one of our support techs may be able to give you some guidance.
- From the Trash Flow tilebar click .
- Using Windows File Explorer, choose the CSV file you want and click .
- Check the Starting Account Number to confirm that the program isn't holding on to some old data.
- For What is the first valid row? choose which line of the CSV starts to contain data (usually 1 or 2).
- For What row, if any, is the header row? choose the header row with descriptions of the columns (usually 1, or 0 if the file has no headers at all).
- Choose one of the Fields (upper left) that you want in the new accounts.
- If data in the field corresponds with a column in your CSV click on the column that you want to match in the file preview, then click . If desired you can also choose a Default option, in case some of the customers you import don’t have a valid entry in that column.
- If you want to include the field in the new accounts but it doesn’t match up with a column in the CSV (i.e., you just want to choose an option for the new accounts from Trash Flow) then choose an Override and click .
- Repeat as needed until all the fields you want have been added to the Field Selection pane.
- Click . Trash Flow will go through the CSV file and make sure everything is ready to import. If this process finds any problems at all it will show you a report of what needs to be changed.
- Fix any problems that the importer found if necessary, then click again.
- Once the scan comes back clean click to import the customers.
Reference: Import Fields
Some fields will display two extra options around the middle of the window: Default and Override. Picking a default tells Trash Flow “Pick this option whenever one of the customers in the file has nothing in that column.” Picking an override, on the other hand, tells Trash Flow “ALWAYS pick this option for every single customer in the file, no matter what is set in the file.”
If you want the import to assign customers to a certain salesperson, bill group, tax district, bill code, route, business, source company, or geographic region please note that the option MUST already exist in Trash Flow—if it does not, click and create those items before trying to run the import. Below is a list of everything available in the Fields pane; many are self-explanatory but are included here in case you need a reference. It would be unusual to try importing all this information since programs differ in what information they make available. If there is info you would like to import for the new customers but you don't see an appropriate match in the list below please contact the data team here at Trash Flow. They have more flexibility in what and how they can import.
- Full Name, Last Name, First Name: Trash Flow saves the customer name in a single field, but some software divides it into first name and last name. You will usually want to pick either Full Name or First Name and Last Name, but not both.
- Billing Attention: Trash Flow will use any name entered here on an ATTN: line when you send out bills.
- Billing Street: Street address or PO box where bills should be sent.
- Billing City: City of the address where bills should be sent; use this if your csv saves the city, state, and ZIP in separate fields.
- Billing State: State of the address where bills should be sent; use this if your csv saves the city, state, and ZIP in separate fields.
- Billing Zip: ZIP code of the address where bills should be sent; use this if your csv saves the city, state, and ZIP in separate fields.
- Billing CityStateZip Some software saves this part of the customer address all together, e.g. Springfield, MO 65897. Choose this option if that’s how it appears in your CSV.
- Physical Attention: Trash Flow will use any name entered here on work orders for the customer and will appear with the physical address on bills.
- Physical Street: Street address where the customer receives service.
- Physical City: City of the address where the customer receives service; use this if your csv saves the city, state, and ZIP in separate fields.
- Physical State: State of the address where the customer receives service; use this if your csv saves the city, state, and ZIP in separate fields.
- Physical ZIP: ZIP code of the address where the customer receives service; use this if your csv saves the city, state, and ZIP in separate fields.
- Physical CityStateZip Some software saves this part of the customer address all together, e.g. Springfield, MO 65897. Choose this option if that’s how it appears in your CSV.
- Physical Latitude: How many degrees north the address is from the Equator. Setting the latitude and longitude allows Trash Flow to show the location on a map.
- Physical Longitude: How many degrees west the address is from the prime meridian. Setting the latitude and longitude allows Trash Flow to show the location on a map.
- Billing Phone 1 Num: The primary phone number to contact about billing.
- Billing Phone 1 Dsc: A description of the primary billing phone number (home, office, cell, etc.)
- Billing Phone 2 Num: A secondary phone number to contact about billing.
- Billing Phone 2 Dsc: A description of any secondary phone number to contact about billing (home, office, cell, etc.)
- Billing Email: If you plan to use Trash Flow to email bills to your customers it must be in this field, not the Physical Email field.
- Physical Phone 1 Num: The primary phone number to contact about service.
- Physical Phone 1 Dsc: A description of the primary phone number to contact about service (home, office, cell, etc.)
- Physical Phone 2 Num: A secondary phone number to contact about service.
- Physical Phone 2 Dsc: A description of any secondary phone number to contact about service (home, office, cell, etc.)
- Physical Email: You can store a second email address in this field for reference but Trash Flow cannot currently use it when sending bills or messages.
- Note 1 (2, 3, 4, 5): The Notes tab on Trash Flow customers can save quite a bit of text. It may be that there’s more than one note you need to bring over from your old data. Saving columns to separate Notes fields will let you preserve the information; it will all save to the customer Notes tab with line breaks between them.
- Route Note 1 (2, 3, 4, 5): The Route Notes sub-tab on Trash Flow customers can save quite a bit of text. It may be that there’s more than one field with route information you need to bring over from your old data. Saving columns to separate Notes fields will let you preserve the information; it will all save to the customer Route Notes sub-tab with line breaks between them. Both printed route sheets and the TeleRoute mobile app can only show the first 255 characters from route notes.
- WO Instructions: Any notes you would want the driver to see when doing a roll-off job for this customer.
- Regular Rate: Usually the amount you charge customers for monthly or quarterly service. Do not use this option if you plan to use bill codes for different kinds of service.
- Old Account Number: The customer's account number in the software you are importing from. This will save to the Dumpster/Misc. field on the Misc. tab of the account.
- Salesperson: The employee responsible for acquiring this account.
- Bill Code (1, 2, 3, 4, 5, 6): A bill code that already exists in Trash Flow that you want to include on the account.
- Bill Code Amount (1, 2, 3, 4, 5, 6): This should be used if you are assigning a zero-rate bill code to customers and you need the importer to set the rate each customer should be charged.
- Account Type: Whether the customer is residential, commercial, or contract.
- Bill Group Every customer in Trash Flow must be assigned to a bill group. Decide how you want to organize customers, because the import will not succeed until a CSV column, default, and/or override have been chosen.
- Business: Every customer in Trash Flow must be assigned to a business. Most companies operate only one business through Trash Flow, but this option is available for users who operate several (e.g., business A handles cart and dumpster service while business B handles roll-offs).
- Tax District: If you charge taxes then each customer should be assigned to a sales tax district so the program knows how much tax to charge and which state, county, etc. should receive the money.
- Source Company: Used to track how you acquired the new customer.
- Geo Region: Used to track where the customer lives (city, county, service area, etc.).
- Route (1, 2, 3, 4, 5, 6, 7): Which route(s) the customer should be on. This option will add the new customers to the end of that route. If you have the correct pickup order for them and want to include it in the import please contact our Data team at 800-708-8642.
- Email Bill: Used to set whether the customer should get an email bill, a printed bill, or both.
- Start Date: Usually either the customer's first day of service or when their billing cycle should begin.
- End Date: Date the customer ended service. Usually when importing customers the only "ended" customers are seasonal customers expected to restart service in the future.
- Balance: The customer's current balance.