This article explains how to make one customer a sub-account of another master account.
Context
Some customers pay for service at different locations. Here are some common situations where this happens:
- A property management company paying for trash pickup at rental units throughout the city
- A parent paying for service for their child across town
- The regional headquarters of a grocery chain needing dumpster service at all local stores
The master account, or parent account, is the account belonging to the person or company paying for the service.
The sub-account, or child account, is the account for a customer that receives services that are billed to another account.
When you print statements, the master account’s bill will include information for each sub-account, including a grand total at the bottom summing up the balance owed for all accounts. If you choose to print numbered invoices, then each sub-account gets its own invoice.
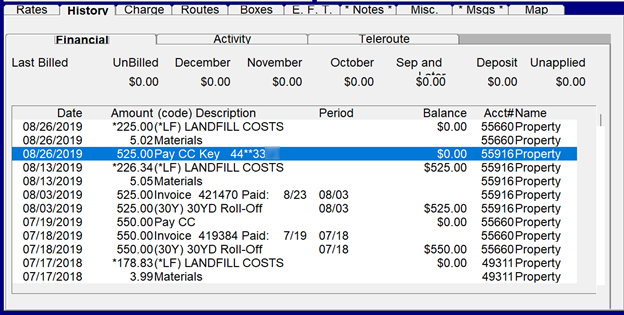
View Financial History for Master and Sub Accounts
-
Go to the History tab of the master account
-
Right-click anywhere in the window.
-
Click View Sub-Accounts. On the right you’ll see the account number and name for each transaction.
Tip: If you do not see the account and name, right-click again and click Display Options > Reset Column Widths. When the customer sends you a payment you can divide that payment as needed. See the article Entering Payments for guidance.
When You're Done
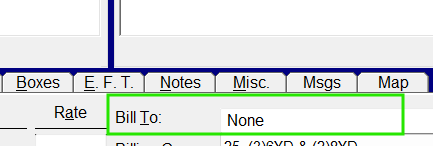
Assign Customer to Bill To Account
-
In the Trash Flow tilebar, click Customers and open the account of the customer that received service.
-
Click in the Bill To field on the Rates tab and enter the name of the customer who should receive the bill for this account.
-
If this account should be set up for automatic payments, go to the E.F.T. tab and follow the instructions found in Setting Up Autopay or Saved Payment Methods for a Customer.
-
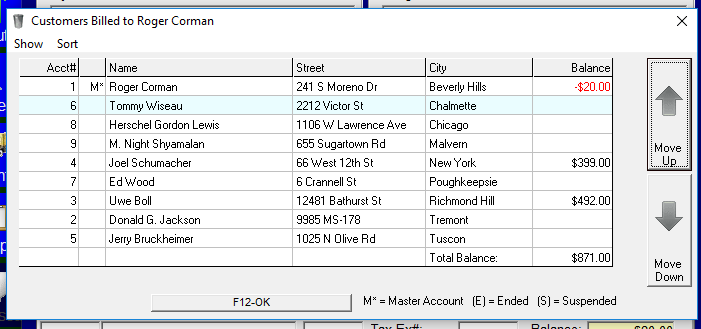
Go to the master account and press SHIFT F1 in the Bill To field or double-click to see all sub-accounts under the master account.
When You're Done
Another Option: Container Placements
If you use Trash Flow’s container tracking module, you can also use multiple container placements to handle customers paying for service at multiple locations. Based on you and your customer’s preferences, you can set up multiple service locations as different accounts, as different container placements, or by combining both methods.
Here are some advantages and disadvantages for each option:
| Method | Advantages | Disadvantages |
|---|---|---|
| Different Accounts |
|
|
| Different Container Placements |
|
|
For more support using container placements, please contact us at 1-800-852-5199.
Additional Resources:
Entering Payments on Bill-to Accounts