Enter a Container Charge
This article explains how to charge a customer for container work without using Trash Flow's work orders.
Before You Begin
A container placement needs to be set up on the Boxes tab of the customer's account. For this process to run smoothly it's best to have the address, rates, and terms of service (like daily rent and tonnage) already set up on the placement. See Create a Container Placement for more information.
Context
Trash Flow provides several ways of charging customers for container work.
- Use (F10) on the Boxes tab of the customer account (covered by the instructions here).
- Create work orders for your drivers and complete them once the work is done; see The Flow of Work Orders for further information.
- Enter a charge on the Charge tab, using a dropdown menu to associate the charge with a particular container placement on the account.
In all these cases the charge in customer history becomes associated with a particular placement. The address (and container number, if available) can appear in the customer's financial history and on invoices or statements. Charging from the Boxes tab is most common for smaller trash haulers with only one or two rolloff drivers. The usual expectation is that the driver will empty and/or deliver a container, then get the relevant information to the office via TeleRoute or paperwork to charge the customer.
Enter the Charge
- Navigate to the Boxes tab of a customer account.
- Click a container placement to select it, then.
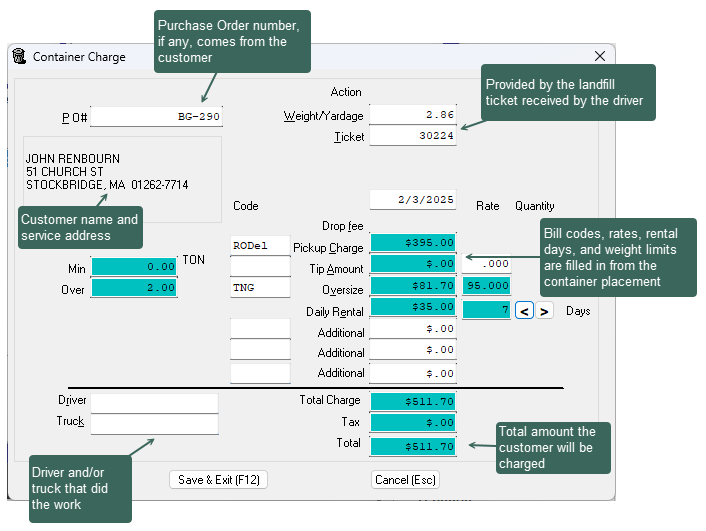
- If required, enter the customer’s Purchase Order #. If a standing purchase order is entered on the customer's Misc. tab this fills in automatically.
- Enter the Ticket number and the Weight/Yardage from the landfill, if applicable.
- Confirm the Date, changing if needed. This will usually be the current business date but can be changed to account for catching up on past work.
- Review the charges in the center of the screen to make sure they’re correct, making any changes if needed. These are automatically pulled from the container placement.
- Select a Driver and/or Truck if desired.
-
 If you use Trash Flow to track your business’s costs to dispose of customer waste a Costs section appears at the bottom of the window. Enter the Miles driven for this trip and add any relevant cost-type bill codes for the Tip, Truck, and Additional costs.
 - Click or press F12 to charge the customer.
Charge Screen
Any charges, ticket numbers, materials, and P.O. numbers will be saved to customer history. You can right-click on a transaction and switch the History view to Containers to see any container number, the address of the placement, and the user who entered the charge.