This topic explains how to financially complete a work order for a customer, often for container work.
Before You Begin
A work order must already have been created in Trash Flow. They're normally created from the customer account, the container placement tab, or the Dispatch window; see Create a Work Order for more information on how to create a new work order. Here are the four ways to access open work orders for completion and billing.
- From a customer’s account: Go to the History tab, select and right-click the relevant work order, and click .
- From the Dispatch window: Select the work order, then click or press F8. If the work order has been assigned to a driver, you can also right-click the work order and click .
- From the container placement: navigate to the WOs tab, select the work order, right-click and .
- From the Billing menu: Click , type the Work Order #, and press the TAB key.
Steps to Follow
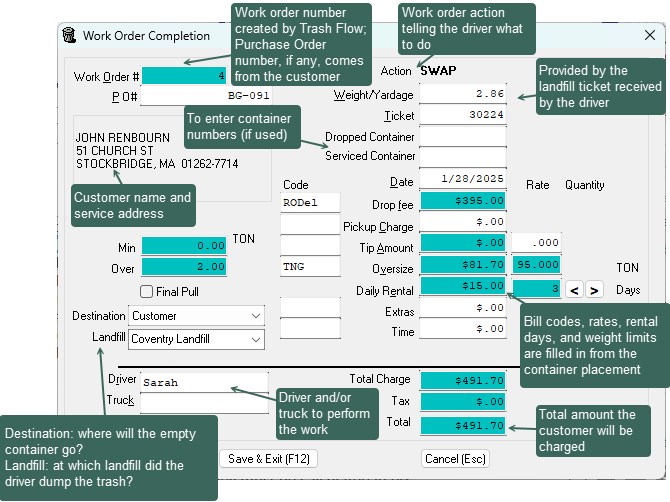
- If required, enter the customer’s Purchase Order #. If a standing purchase order is entered on the customer's Misc. tab this fills in automatically.
- Enter the Ticket number and the Weight/Yardage from the landfill, if applicable.
- If you track container numbers enter the number of any Dropped Container.
- Confirm the Date, changing if needed. This will usually be the current business date but can be changed to account for catching up on past work.
- Review the charges in the center of the screen to make sure they’re correct, making any changes if needed. These are automatically pulled from the relevant container placement.
- Depending on how the work order action is set up you may be able to enter additional bill codes in the Code column to charge the customer for any extras, or just type the amount of an extra charge to the right.
- Trash Flow will automatically fill in the number of days to charge for Daily Rental; use the arrows to change this if needed. (This is usually done when negotiating with the customer, e.g. "I'll knock off four rental days for that box.")
- Choose a Destination for the container, if desired. This is usually a specific container yard or simply a different customer.
- Enter which Landfill the driver dumped at, if applicable. This list is taken from the list of Site Locations in the System menu.
- Select a Driver and/or Truck if desired.
-
 If you use Trash Flow to track your business’s costs to dispose of customer waste a Costs section appears at the bottom of the window. Enter the Miles driven for this trip and add any relevant cost-type bill codes for the Tip, Truck, and Additional costs.
 - Click or press F12 to complete the work order and charge the customer.
When You're Done
Trash Flow adds the charges to the customer account so they can be billed. (Some companies prefer to keep a credit card on file to be run whenever a job is done.) It also marks the work order as completed so it no longer shows as open or appears on the driver's schedule.
Further Information
- All white boxes in the Work Order Completion window can be typed in. Boxes with a colored background are filled in automatically from data in other parts of Trash Flow and cannot be directly changed.
- This topic describes financially completing a work order. Trash Flow also tracks when a work order is physically completed. This normally does not take any steps on your part: the driver's TeleRoute app sends the date and time to Trash Flow. If you don't use TeleRoute you can either
- set an option to automatically fill in those times when the work order is financially completed; or
- select the work order in the Dispatch window and use the and buttons to record the time the driver spent on the job.