Description
The customer list is one of the most commonly run reports in Trash Flow. It's a way to get a list of all customers or of a given subset of customers. This guide explains how to create the report. It includes a sample report at the bottom.
Context
Customer lists might be run for many reasons. Some common examples:
- seeing how many active customers you have;
- looking for customers who aren't on a route;
- seeing if any customers don't have a rate on their account and are getting free service;
- comparing how many customers are in different regions;
- figuring out how many new customers started in the past year;
- finding accounts set up for automatic payment where the credit card has expired;
Steps to Follow
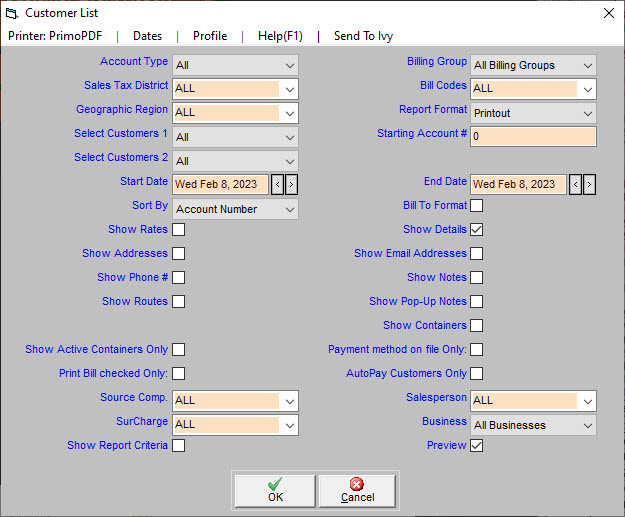
- Choose a Report Format (usually Printout) and what method the report should Sort by.
- Use the filtering options to pick whether you want to include all customers or only some. See the list of filtering options below for more information.
- You will not usually need to set a Start Date and End Date, though a few report options do look for customers who meet a condition within a certain date range.
- Use the remaining options to set which accounts will be included in the report and what details will be shown.
- Choose whether you want to Preview the report (usually checked) and Show Report Criteria (usually unchecked).
- Click to review and print.
Reference: Data Filters
The customer list is a highly customizable report that lists details about your customers. Some of the options here set which accounts will be included in the report.
- Account Type: Chooses whether to include residential, commercial, contract, or all customers.
- Billing Group: Chooses whether to include customers in a specific billing group or in all billing groups.
- Sales Tax District: Chooses whether to include customers from a specific sales tax district or from all districts.
- Bill Codes: Chooses whether to include customers with all bill codes, with one specific bill code, or no assigned bill codes.
- Geographic Region: Chooses whether to include customers in a specific geographic region, all geographic regions, or no geographic region.
- Select Customers 1 and 2: These two fields can be used to set additional options for the report: customers who started or ended service within a certain date range, customers who have (or have not) ended service, customers without a recurring rate on their account, customers not assigned to a route or only routed customers, customers whose accounts are suspended or whose credit cards have expired, customers with an invalid email address, customers with a certain bill delivery method, customers who are tax exempt, only customers who have pop-up notes; and only customers who were active (no end date) during the date range.
- Starting Account # Chooses to start the report at the specified account number and include all higher account numbers. If this box is left blank, the report will include all relevant customer accounts.
- Source Co.: Chooses whether to include customers from a specific source company or from all companies.
- Salesperson: Chooses whether to include customers from a specific salesperson, from all salespeople, or from no salesperson
- Business: Chooses whether to include customers of one of your businesses or customers of all your businesses.
- EFT Customers Only?: Chooses whether to only include customers who are billed by electronic funds transfer (EFT).
Reference: Data Display Settings
These options set which details will be included in the report.
- Bill-to format: A specialized format that lists each bill-to master account along with all its sub accounts.
- Show Rates: Chooses whether to print the rates each customer pays.
- Show Details: If this option is checked the report will list all customers who meet the criteria. If unchecked the report will only list the total number of customers that fit the categories chosen above—no account details or customer names will be printed.
- Show Addresses: Chooses whether to print the customer’s address.
- Show Phone #: Chooses whether to print the customer’s phone number.
- Show Notes: Chooses whether to print notes on the customer’s account.
- Show Routes: Chooses whether to print the routes each customer is on. If you choose to export the customer list rather than create a PDF then the resulting file will include a separate row for each route a customer is on.
- Show Pop-Up Notes: Chooses whether to print any pop-up notes on the customer’s account.
- Show Placements: Chooses whether to list the customer’s container placements.
Sample Report
When You're Done
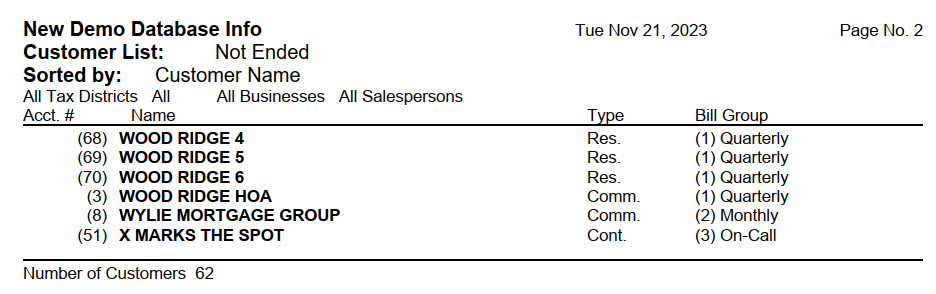
The finished report will include a list of all customers that meet the criteria (if details was checked) and a final line with the total number of customers requested.
For Trash Flow Mobile users: Report options on Trash Flow Mobile will work just as described in this article and appear in the same order. The user interface is slightly different to accommodate how we use tablets and phones; for more details, or to learn more about accessing your data from a phone or tablet, see Using Trash Flow Mobile.