What are Containers used for?
Container Tracking allows you to assign containers to customers, mark containers on routes, create work orders for your drivers, negotiate and set payment terms for container disposal, quickly charge customers by container placement, and track a container’s placement history.
It’s a good idea to choose some kind of consistent rules for naming your containers. You could type them in sequentially (001, 002, 003); type a serial number from the manufacturer; create your own tracking numbers using the container size and numbers; or use any other naming convention that makes sense to you.
How do I enter a new container?
- Click Containers on the Trash Flow tilebar to bring up a selection screen.
- Type in a number for the box (this can be any kind of serial number, inventory number, unique name, etc.) and press ENTER.
- A window will inform you that you’ve entered a new container and ask you to confirm whether you want to add it to Trash Flow; click .
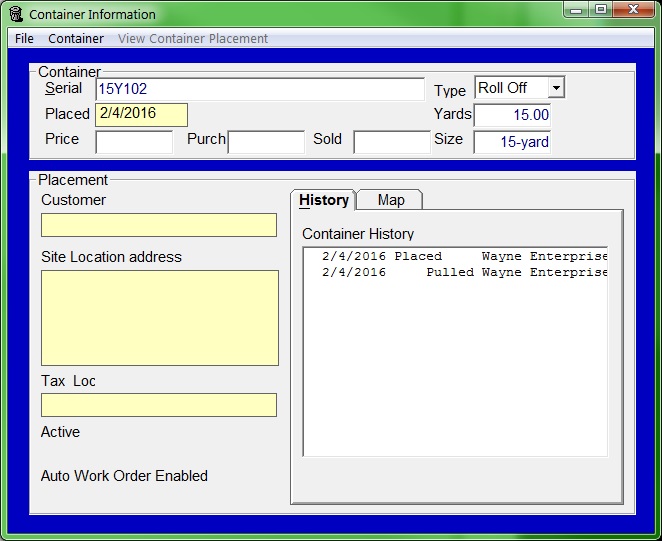
- Enter the following information in the Container screen:
- Type: Choose the type of container from the list: rear load, front load, roll-off, cart, compactor, toilet, sideload, trailer, or other.
- Yards: Type the volume of the container in cubic yards.
- Size: Type a description of the container size (optional).
- Price: Type the price that you paid for the container (optional).
- Purch: Type the date that you purchased the container (optional).
- Sold: If you ever sell the container, type the sold date (optional).
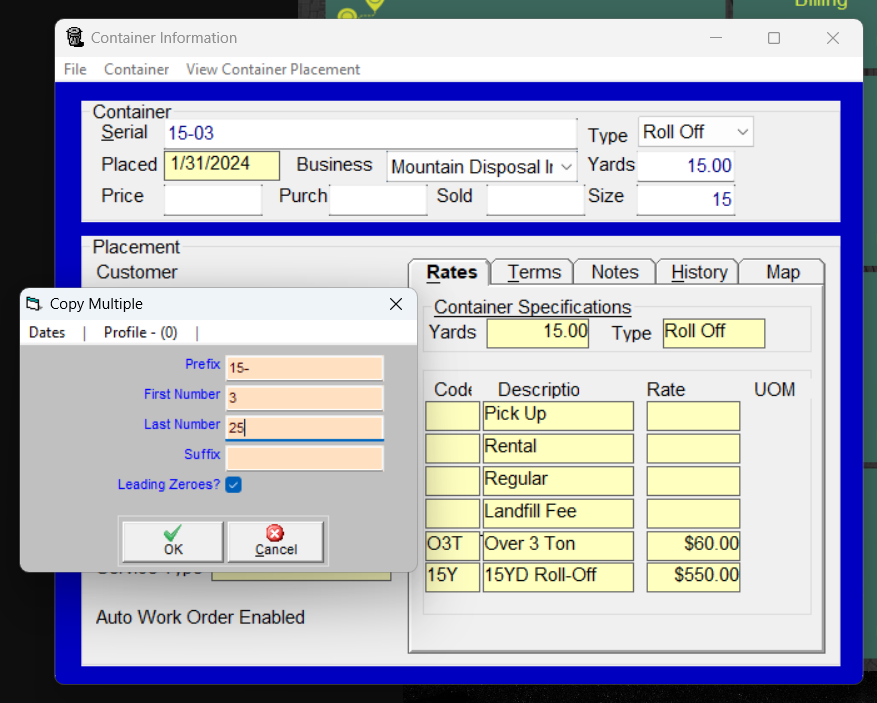
How do I enter many containers at once?
- Click Containers on the Trash Flow tilebar and choose the container you will use as a template. Make sure that the Type and Yards field are filled in correctly.
- Click (or press SHIFT - F4).
- Fill out the First Number and Last Number fields.
- If desired you can also choose to include a Prefix and/or Suffix to the new container numbers. (In the example below we are starting with a 15-yard roll-off container, 15-03. Once we click there will be 23 more containers in the system: 15-04 through 15-25.)
- Click OK to finish adding the new containers.
Further information
The remaining fields in the window pull information from elsewhere in Trash Flow and only show when the container is currently placed; the fields are not changeable from this screen. It’s important to understand that charges, payment terms, work order information, and notes are not saved with the container itself, but with customers’ container placements. The only important information saved with the container is its serial number, type, size, and a history of where it’s been.
- Placed: If the container is at a customer location, this field shows the date it was initially placed.
- Customer: If the container is at a customer location, this field shows the customer’s name.
- Site Location address: If the container is at a customer location, this field shows the address.
- Tax Loc: If the container is at a customer location, this field shows the customer’s sales tax district.
- History: If the container has ever been assigned a customer location, this field shows the names and dates of those placements.
- Active?: An entry on the bottom left of the window states whether the container placement is Active or Inactive. An inactive container does not show up on route sheets and does not receive regular charges.
- Service: If the container placement has been designated for a certain type of trash (trash, recycling, C&D, etc.) that information will display here.
- Auto Work Order: Unless this option has been disabled on the container placement, the container will show Auto Work order as enabled. This option includes the container when generating a list of work orders for an entire route.
From the container information window, you can:
- Change the serial number by pressing F5;
- Make a copy of the container by pressing F4, then typing in the serial number of a new container to be created. It will have the same size, yardage, and type as the original. When adding in a long list of containers of the same size, this can save significant time.
- Search for a different container by pressing F2;
- Delete the container by pressing F7;
- If the container is placed with a customer, view the container placement by clicking ;
- If the container is placed with a customer, open the customer’s information by pressing F6;